AutoFEM Static Analysis
The main goal of static analysis is to check a structure used in machine-building or construction for strength.
At that, for the purposes of static analysis, it is assumed that forces applied to the structure do not change with time going on.
Most often, assessment of the static strength is carried out by way of comparing calculated strains in the structure and the yield point of the respective material. If the structure's strains do not exceed the material's yield point, this means that, with the applied loads, the system suffers only elastic deformations and the shape of the structure will be completely restored after the load disappears. Such mode of the item's functioning is most favourable in most cases.
If the structure's strains exceed the material's yield point, the deformations which the item suffers from the applied loads become irreversible and the structure will be irreversibly deformed. As a rule, under operating conditions of the item, this is inadmissible, and one should avoid such cases. (For more detail about strength theories, see the AutoFEM Analysis user manual.)
It is for such check of the structure's strength that the AutoFEM Static Analysis module is intended. It ensures the calculation of strength and strained condition for machine-building and construction structures directly in the AutoCAD environment. In advance, a 3D model of the system subject to calculation must be created or imported in AutoCAD. The functionality of the static analysis module permits to solve a variety of problems related to strength calculation. It has the following functional possibilities:
- take into account the geometric non-linearity;
- determine the stress-strain state of temperature effect;
- perform calculations of contact problems;
Accounting for the influence of different types of mechanic loads such as force, pressure, linear acceleration, centripetal acceleration, and torque moment, load of bearing, hydrostatic pressure, additional mass, and rigidity (elastic base). Also, one can account for and set preliminary deformations of the structure (preliminary strained condition).
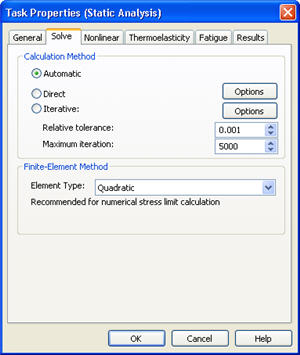
Setting window parameters for static analysis
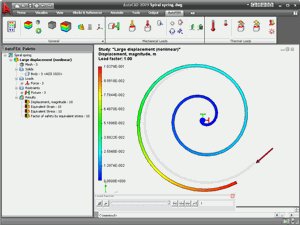
If it is assumed that under the load a part may suffer significant displacement, one should conduct static analysis which takes into account large displacements.
The non-linear problem-solver organizes the process of incremental loading and provides the solution of the linear system of equations at each loading step.
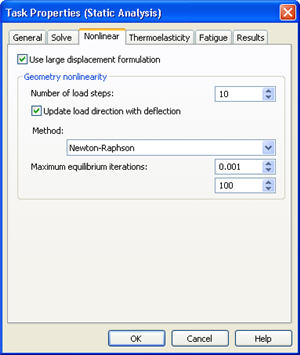
Setting window parameters for non-linearity
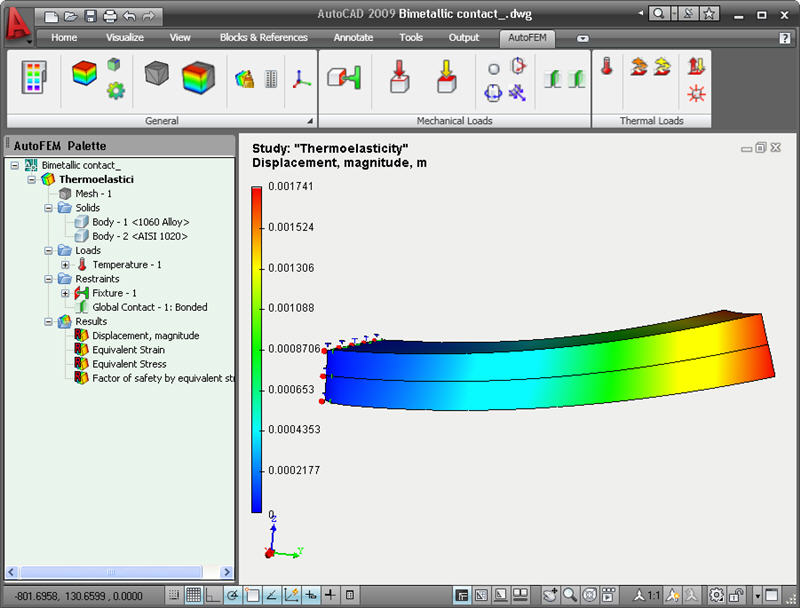
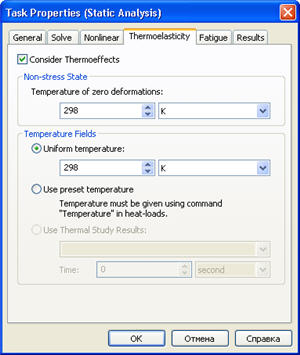
Setting window parameters for the solution of thermal elasticity problem
As a result of solving the problem of modelling the stressed state of the structure, numerous results are available, such as:
- fields of displacements of the structure in nodes of finite-element mesh;
- fields of strains - normal strains, shear strains, equivalent strains;
- fields of components of the stresses - normal stresses, shear stresses, equivalent stress (von Mises stress);
- energy of deformation;
- reaction forces;
- field of distribution of safety factors - factor of safety by principal stress, factor of safety by normal stress, factor of safety by equivalent stress.
This information is usually sufficient to predict the behaviour of structures and make a decision how to optimize the geometric shape of the product.
|
Below you can find various examples of using AutoFEM Static Analysis for solving problems of strength calculations. Verification Examples of AutoFEM Static Analysis |
|
|
|
|
|
|
|
|
|
|
|
|
|
|
|
|
|
|
|
|
|
|
|
|
|
|
|
|
|
|
|
|
|
|
|
|
|
|
|
|
|
|
|
|
|
|
|
|
|
|
|
|
|
|
Stresses and deformations of an orthotropic plate at biaxial tension |
|
Thermoelasticity |
|
|
|
|
|
|
|
|
Contact problems |
|
|
|
|
Quick Start (Tutorial) on AutoFEM Static Analysis (online tutorial)
Welcome!
This lesson will help you to carry out the static strength calculation of the part with the help of the AutoFEM Analysis.
You will learn to:
![]() create a Static Analysis study;
create a Static Analysis study;
![]() create a finite element mesh;
create a finite element mesh;
 specify materials;
 specify loads and restraints;
 obtain calculation results in the form of colour plots.
Download tutorial video of the AutoFEM Static Analysis Module
Creating Static Study
Step 1: Create the Static Analysis Study
To start work, open the example 3D model in AutoCAD.
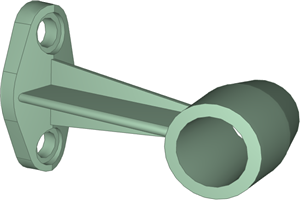
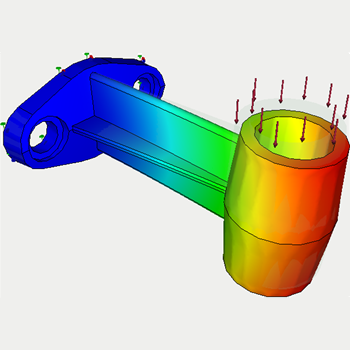
Let us calculate the static strength of the bracket, shown on the picture.
To create the Static Analysis problem, the following sequence of steps must be carried out:
1. Invoke the New problem's properties window using one of the following methods:
|
Command Line: |
FEMASTUDY |
|
Main Menu: |
AutoFEM | Create a Study... |
|
Icon: |
|
2. Select the type of the study ( "Static Analysis" ) and add to the list ( "Selected Geometry" ) a solid:
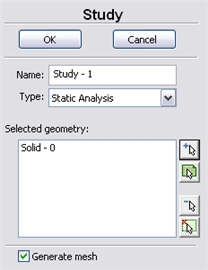
3. Since the option "Generate mesh" is activated, after setting up the problem, the system will automatically proceed to creating finite element mesh;
4. Press ![]() for confirmation of New problem creation.
for confirmation of New problem creation.
Create Mesh
Step 2: Create the Finite Element Mesh
After the problem setup, the system automatically proceeds to creating finite element mesh.
To create manually (or modify) the finite element mesh, we need to carry out the following sequence of steps:
Invoke the Mesh's properties window by one of the following methods:
|
Command Line: |
FEMAMESH |
|
Main Menu: |
AutoFEM | Create Mesh... |
|
Icon |
 |
Let us build the mesh with the edge length of an element will be no greater than 2.500 mm
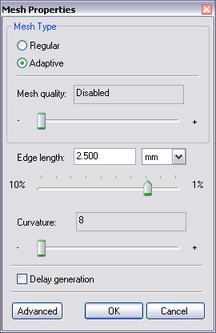
Press ![]() for completing creation (or modification) of the mesh.
for completing creation (or modification) of the mesh.
The result of mesh generation is displayed in the 3D window.
Instead of the original model, now you will see the image of the mesh. The original model is not shown at that moment.
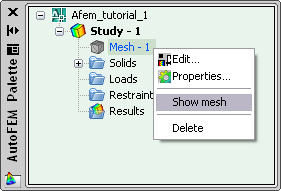
In case it is necessary to hide or display again the finite element mesh, choose the element "Mesh" in the service window "AutoFEM Palette" , then invoke the command "Hide Mesh" or "Show Mesh" from the context menu (by pressing ![]() ).
).
Apply Loads
Step 3: Apply Loads
To apply the "Force", we need to carry out the following sequence of steps:
Firstly, to define the direction of the force, we will import the named User Coordinate System (UCS). Of course, UCS must be created in AutoCAD before. We can import UCS into AutoFEM by one of the following methods:
|
Command Line: |
FEMALCS |
|
Main Menu: |
AutoFEM | Reference Geometry | Coordinate System... |
|
Icon: |
|
Click the button ![]() and choose the UCS from the list "Named CS". Then click the buttons
and choose the UCS from the list "Named CS". Then click the buttons ![]() and
and ![]() .
.
This imported Coordinate System was built so that the Z-Axis has been directed along the axis of the cylindrical face.
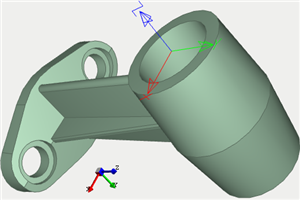
Invoke Load's properties window by one of the following methods:
|
Command Line: |
FEMAFORCE |
|
Main Menu: |
AutoFEM | Loads\Restrains | Force |
|
Icon: |
|
In the properties window for the "Force":
a) select a face for load application;
b) select the load direction (Z-Axis of the selected Coordinate System);
c) select the units and the magnitude of the load (in our case the value is equal to 50 kgf).
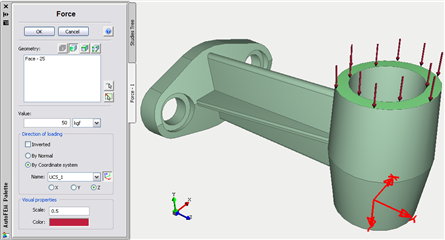
Press ![]() to confirm the load creation.
to confirm the load creation.
Define Restraints
Step 4: Define Restraints
To impose constraints on the displacements, we need to carry out the following sequence of steps:
Invoke the properties window of the Restraint by one of the following methods:
|
Command Line: |
FEMAFIX |
|
Main Menu: |
AutoFEM | Loads\Restrains | Fixture... |
|
Icon: |
|
In the properties window of the Restraint we need to:
a) select the fixed type of the restraint;
b) select the entities to be constrained - face;
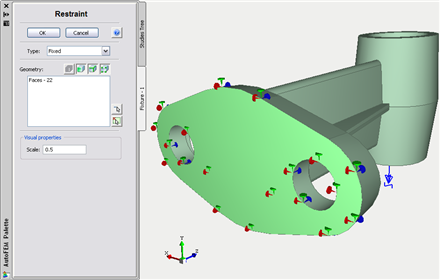
Press ![]() to confirm the Restraint creation.
to confirm the Restraint creation.
Specify Material
Step 5: Specify a Material for Static Study
For each problem of the finite element analysis, it is important to correctly specify characteristics of the part's material.
To specify (or modify) the material, we need to carry out the following sequenceof steps:
Invoke the material's properties window by choosing the solid in the service window "AutoFEM Palette" and performing the command "Material..." from the context menu (by pressing  ).
).
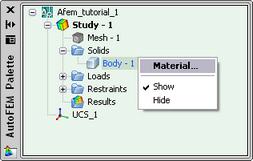
- Provide a library of materials (into the group "Library");
- From the list of materials, select, for example, "Steel AISI 1020";
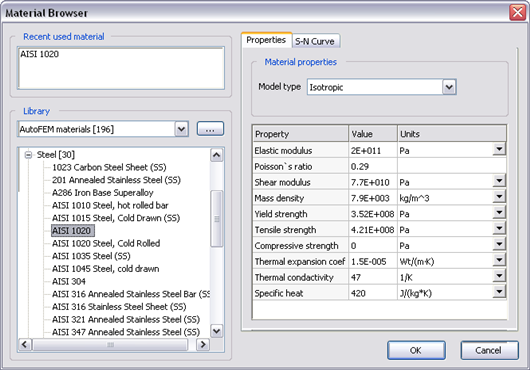
Confirm your selection by pressing ![]() .
.
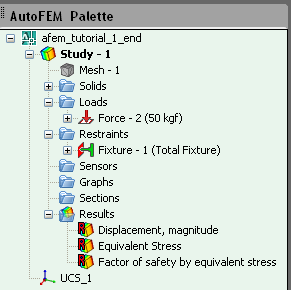
Working with the "AutoFEM Palette" Window
Working with the "AutoFEM Palette" Window
All problems of the document and their components are shown in the service window "AutoFEM Palette" in the form of the structured tree. This window appears automatically after creating the study. If it is necessary, it can be closed or displayed again with the help of the command:
|
Command Line: |
FEMAPAL |
|
Main Menu: |
AutoFEM | Palette of Studies |
|
Icon: |
|
The element "Study" combines all components and objects specified for performing the calculation: finite element mesh ("Mesh"), mechanical loads ("Loads"), constraints ("Restraints").
The folder "Results" is empty until calculation was successfully done.
Solve Study
Step 6: Solve the Static Study
After constructing the finite element mesh, specifying the loads and constraints, the calculation can be performed.
To solve the problem, the following sequence of steps must be carried out:
Invoke the solution's properties window by one of the following methods:
|
Command Line: |
FEMASOLVE |
|
Main Menu: |
AutoFEM | Solve... |
|
Icon: |
|
On the tab "Solve", in the group "Calculation Method" select "Iterative";
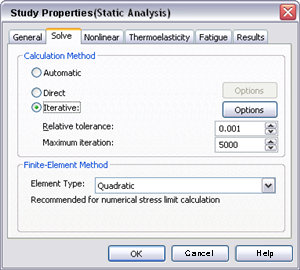
Press ![]() , to start calculation.
, to start calculation.
Customizing Results of the Static Study
Customizing Results of the Static Study
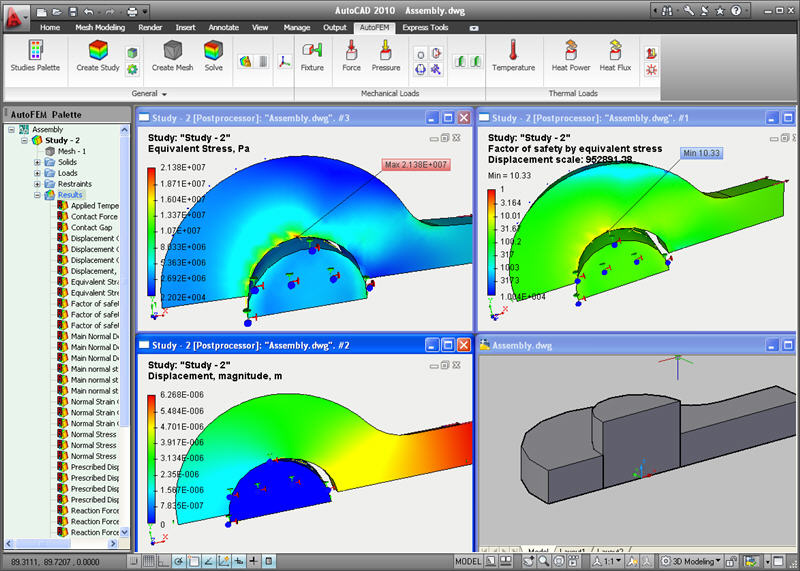
After successful solution of the Static Analysis problem, we need to analyze the obtained results to draw a conclusion about the static strength of the part. In most cases, it is sufficient to analyze three types of results: "Displacement, magnitude", "Equivalent Stress", "Factor of safety by equivalent stress".
The list of results available for viewing is shown in the problems tree in the folder "Results".
To extend the list of results shown in the problems tree, the user has to:
- From the context menu popping up upon pressing
 on the name of the selected problem, invoke the window for customizing results (command "Results...");
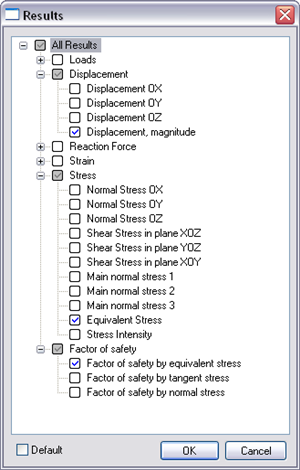
2. Check the results you need;
3. Press ![]() .
.
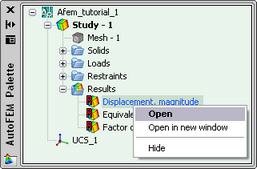
For viewing a result, select it with  in the problems window and select the command "Open". You can also use
 . The result will be shown in a window of the Postprocessor.
Analyzing the Results (Displacements, Stresses, Safety Factor)
Step 7: Static Analysis. Step 7: Analyzing the Results (Displacements, Stresses, Safety Factor)
Displacement Analysis.
Open the result "Displacement, magnitude".
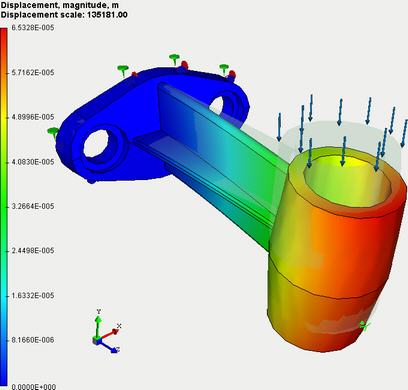
Visually estimate the distribution and the magnitude of the displacements, thus, checking if the loads are applied correctly.
Stress analysis.
Open the result "Equivalent Stress".
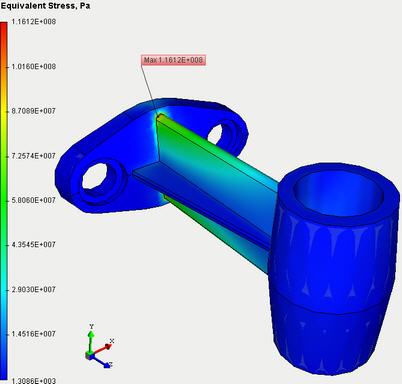
Estimate in what places and components of the structure the maximum stresses arise. By comparing the maximum values of the computed stresses with the allowable stresses for the material, which the part is made of, the degree of the structure's strength can be estimated.
Analyze the Safety Factor.
Estimate the strength assurance factor.
Open the result "Factor of safety by equivalent stress".
This result allows us to estimate quantitatively the ratio of the allowable stresses, specified in the material's characteristics, to the calculated equivalent stresses. If the ratio of the allowable to the calculated stresses is approaching one or smaller than one, then the strength criterion is not satisfied, and, hence, the modifications must be made in the part.
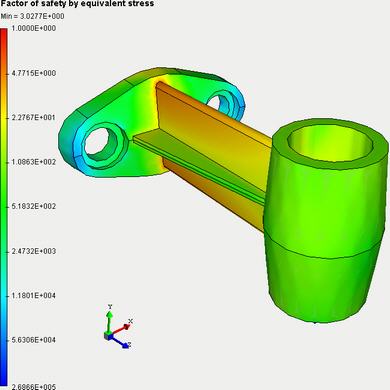
The minimum value of the strength assurance factor, obtained as a result of calculation, is greater than 1. Therefore, the part satisfies the strength criterion, and no changes in the part need to be made.
Generate Report
Step 8: Generate a Report
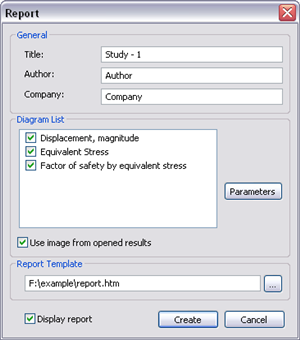
The user can create independent of the AutoFEM electronic documents which include the main information about the solved problem. The report is created in the html- format.
To create the report, the user needs to:
- Invoke the dialog for customizing the report, the command of the main menu: AutoFEM | Create Report...;
- Fill in the fields in the group "General";
- Tick off the results which have to be included in the report in the "Diagram List";
- Turn on the options "Use image from opened results" and "Display report";
- Pressing the button
 leads to appearance of the dialog for saving the report file.
Congratulations!
Congratulations!
You successfully completed the static strength calculation for the part with the help of the AutoFEM Analysis Lite .
